Tips for a Perfect Paint Job
Dec. 29, 2021Anyone can paint a room, right? But not everyone knows the secrets to painting a room well. Check out these basic tips for a flawless finish and faster cleanup.
We've received hundreds of painting tips from readers and painting contractors over the years. We culled through them and came up with this collection of painting basics that will make your projects easier, faster and give you superior results.
Set up a staging area
Gather all the tools for the entire project
Step one in any painting job is to establish a spot for your stuff. Think through the whole project, gather up all the tools and supplies you’ll need and pile them just outside the room. All the gear will be out of your way but within easy reach. And you won’t be tripping over it, constantly moving it or hunting for it during the job.
Prime every patch
Apply primer by dabbing it against the wall
You've filled in the dents and dings, and now it's time to paint, right? Wrong! All those patches, even the tiny ones, must be primed. The unprimed patches will absorb paint and leave noticeable dull spots (called “flashing”). When you apply primer, don't just brush it on. The tiny ridges of brush marks will show through the paint coat. Instead, “stipple” it on by dabbing your brush against the wall. The bumpy texture will better match the texture of rolled-on paint.
Plastic drop cloths lead to paint tracks
Use canvas instead
Plastic sheets are great for protecting woodwork or furniture, but they’re a bad choice for floors. They’re slippery on carpet and they don’t stay put. Even worse, plastic promotes tracking. That’s because spills and drips sit on the surface and dry very slowly, giving you plenty of time to step in the paint and track it around. Fabric, on the other hand, lets paint dry fast, from above and below. Canvas drop cloths are best, but a double layer of old bed sheets works well too.
Avoid paint freckles
Wear the right gear
Rolling paint on the ceiling showers you with a fine mist. A baseball cap is essential and safety glasses let you watch your work without squinting. To make skin cleanup easier, rub lotion on your face, arms and hands. At the end of the day, your paint freckles will wash right off.
Overnight storage
Seal brushes in a freezer bag
If that “quick” painting project didn’t go as fast as you’d hoped and you need an extra day, seal your brushes in a freezer bag. As long as it's airtight, you can store brushes for up to a week without cleaning. But don’t push it; any longer and they’ll dry out and stiffen up, making cleanup that much harder.
Wipe down the walls
Use slightly soapy water
Static electricity makes dust, lint and even pet hair stick to walls. Rolling paint without cleaning the wall will enshrine them Pompeii-style for all to see. Plus, paint adheres better to clean walls. So wipe down the walls with a damp sponge and warm water before painting. Add a smidgen of dishwashing liquid to the water. A couple of drops is just enough to cut through oil and greasy fingerprints without creating suds that you’ll have to wipe off later.
Keep a scrapbook
Keep the paint can labels
Those labels on paint can lids are like the paint's DNA. They contain all the information needed to duplicate the color and sheen.
Paint out of a bucket
Don’t use paint roller trays
Forget about paint roller trays. They're inconvenient and easy to kick over or step in. Instead, pour all of the paint you need for the entire room into a 5-gallon bucket and stir the paint together. This ensures a consistent color throughout the room. If you switch gallons in the middle of a wall, the paint may look different—even if the color is made the same at the paint store. Hang a $2 roller screen in the bucket to use with your paint roller.
Painting ceilings
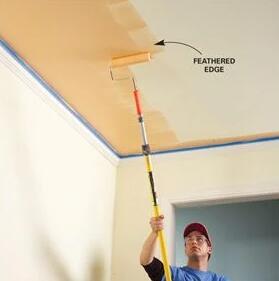
Feather the edges
You can't keep a wet edge when painting ceilings—they're just too large—but you can minimize lap marks by feathering out the edges. Roll the nearly dry roller in different directions along the edge, feathering out the paint. Once you complete an entire length of the ceiling, move to the next section and paint over the feathered edge. If you need a second coat, apply the paint in the opposite direction.
