Paint faster and smoother with the right rolling techniques
Dec. 29, 2021These DIY painting tips will help you roll your walls quickly and smoothly—without leaving roller marks. We'll show you the tricks and techniques that painting pros use to get a perfectly painted room. All you need are some basic tools to paint fast, get great results and make clean up a breeze. Painting is one of the least expensive ways to make over a room, so grab a roller and let's get to work.

A slightly different approach
Most of you have probably used paint rollers before, with varying degrees of success. Maybe you just plunged right in and started rolling, developing your own technique as you went. Or maybe you read the instructions telling you to apply the paint in some pattern, usually a “W,” before rolling it out. We’re going to show you a slightly different approach. In this article, we’ll teach you a simple method to quickly spread a smooth, even coat of latex paint on the wall. It’s not fancy, but it gets the job done in record time and eliminates common problems like light areas, roller marks and built-up ridges that sometimes plague first-time painters.
However, even the best technique won’t work with poor-quality equipment. Don’t waste your money on those all-in-one throwaway roller setups when you can buy a pro setup that will last a lifetime. Start with a good roller frame. To extend your reach and give you better control, screw a 48-in. wood handle onto the end of the paint roller. You could also use a threaded broom handle. You’ll need a container for the paint. While most homeowners use paint trays, you’ll rarely see a pro using one. That’s because a 5-gallon bucket with a special bucket screen hung over the edge works a lot better.
Here are a few of the advantages of a bucket and screen over a paint roller pan:
▴It’s easy to move the bucket without spilling
▴The bucket holds more paint. You won’t have to frequently refill a pan.
▴You’re less likely to trip over or step in a bucket of paint.
▴It’s quicker and easier to load the paint roller cover with paint from a bucket.
▴It’s easy to cover a bucket with a damp cloth to prevent the paint from drying out while you’re taking a lunch break.
Use an old drywall compound bucket or buy a clean new bucket. Add bucket screen and you’re ready to go.
How to properly paint a wall
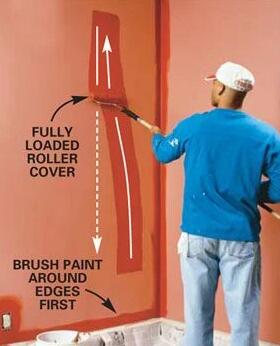
Roll up and down, from floor to ceiling and move over about three-quarters of a roller width each time so you’re always slightly overlapping the previous stroke. When you reach the corner, roll as close as you can to the adjacent wall without touching it. Repeat Steps 1 through 3 until the entire wall is painted.
Take a wool-blend roller cover for a spin
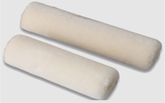
The most important part of your paint rolling setup is the roller cover, also known as a sleeve. It’s tempting to buy the cheapest cover available and throw it away when you’re done. But you won’t mind the few extra minutes of cleanup time once you experience the difference a good roller cover makes. Cheap roller covers don’t hold enough paint to do a good job. It’ll take you four times as long to paint a room. And you’ll likely end up with an inconsistent layer of paint, lap marks and built-up ridges of paint.
Instead, buy a 1/2-in. nap wool blend roller cover and give it a try. (One good one is the Sherwin-Williams Poly/Wool cover, which is a combination of polyester for ease of use and wool for maximum paint capacity.) With proper care, this may be the last roller cover you’ll ever buy.
Wool covers do have a few drawbacks, though. They tend to shed fibers when they’re first used. To minimize shedding, wrap the new roller cover with masking tape and peel it off to remove loose fibers. Repeat this a few times. Wool covers also tend to become matted down if you apply too much pressure while painting. Rolling demands a light touch. No matter what roller cover you’re using, always let the paint do the work. Keep the roller cover loaded with paint and use only enough pressure to release and spread the paint. Pushing on the roller to squeeze out the last drop of paint will only cause problems.

Tips for a perfect paint job
△Keep a wet edge.
Keeping a wet edge is crucial to all top-quality paint jobs, whether you’re enameling a door, varnishing furniture or rolling paint on a wall. The idea is to plan the sequence of work and work fast enough so that you’re always lapping newly applied paint onto paint that’s still wet. If you stop for a break in the middle of a wall, for example, and then start painting after this section has dried, you’ll likely see a lap mark where the two areas join. The rolling technique we show avoids this problem by allowing you to quickly cover a large area with paint and then return to smooth it out—which brings us to the second important painting technique.
△Lay it on, smooth it off.
The biggest mistake most beginning painters make, whether they’re brushing or rolling, is taking too long to apply the paint. Photo 1 shows how to lay on the paint. Then quickly spread it out and repeat the laying-on process again (Photo 2). This will only work with a good-quality roller cover that holds a lot of paint. Until you’re comfortable with the technique and get a feel for how quickly the paint is drying, cover only about 3 or 4 ft. of wall before smoothing the whole area off (Photo 3). If you find the paint is drying slowly, you can cover an entire wall before smoothing it off.
△Get as close as you can.
Since rollers can’t get tight to edges, the first painting step is to brush along the ceiling, inside corners and moldings. This “cutting in” process leaves brush marks that won’t match the roller texture on the rest of the wall. For the best looking job, you’ll want to cover as many brush marks as possible with the roller. Do this by carefully rolling up close to inside corners, moldings and the ceiling. Face the open end of the roller toward the edge and remember not to use a roller that’s fully loaded with paint. With practice, you’ll be able to get within an inch of the ceiling rolling vertically, and can avoid crawling up on a ladder to paint horizontally like we show above.
△Pick out the lumps before they dry.
It’s inevitable that you’ll end up with an occasional lump in your paint. Keep the roller cover away from the floor where it might pick up bits of debris that are later spread against the wall. Drying bits of paint from the edge of the bucket or bucket screen can also cause this problem. Cover the bucket with a damp cloth when you’re not using it. If partially dried paint is sloughing off the screen, take it out and clean it. Keep a wet rag in your pocket and pick lumps off the wall as you go. Strain used paint through a mesh paint strainer to remove lumps.
△Scrape excess paint from the roller before you wash it.
Use your putty knife, or better yet, a special roller-scraping tool with a semicircular cutout in the blade. Then rinse the roller cover until the water runs clear. A roller and paint brush spinning tool simplifies the cleaning task. Just slip the roller cover onto the spinner and repeatedly wet and spin out the roller until it’s clean.


